こんにちは!コアシステム開発Gでテックリードをやっている古賀です。
APIを改修しようとすると、「どのようなリクエストを送るべきか?」「レスポンスはどのような形式か?」といった疑問に直面することは少なくありません。
コードを読まなければ分からなかったり、ドキュメントがあるものの埋もれていたりすると、そのたびに調査が必要になり生産性を下げてしまいます。
これを防ぐには、API仕様を事前に定義し、誰でも簡単に参照できるようにしておくことが有効です。
APIスキーマを定義する手段としては、gRPCのProtocol Buffersや、GraphQLのスキーマ定義言語など、目的に応じていくつかの方法が存在します。
その中でも、HTTPベースのRESTful APIにおけるスキーマ定義ツールである OpenAPI Specification((以下 OpenAPIと表記)を紹介します。
OpenAPIは API のエンドポイントやHTTPメソッド、リクエスト/レスポンスの構造、各種パラメータの型や制約などを、YAMLやJSON形式で記述できる仕様です。モックサーバ構築やクライアント/サーバコードの自動生成にも活用できます。
OpenAPI の構造
OpenAPI を使ってどのようにAPIスキーマを記述するのか見ていきましょう。
スキーマ構造は3つのセクションに分けられます。
- Meta information: APIのタイトルやバージョンなど基本的な情報を記述する
- Path items (endpoints): エンドポイントごとのHTTPメソッドやリクエスト/レスポンスの構造を定義する
- Reusable components: スキーマ定義の再利用を目的とした共通部品をまとめる
これらのセクションごとに、具体例を交えながら書き方を解説していきます。
OpenAPI バージョンは 3.0.0、YAML形式で書いていきます。
Meta information
API のタイトルや説明、バージョンなど基本的な情報を記述します。
openapi: 3.0.0 # OpenAPI バージョン
info:
  title: Pet Store  # タイトル
  description: This is a sample Pet Store Server  # APIの説明
  version: 0.0.1   # API バージョン
servers:
  - url: https://petstore3.swagger.io/api/v3 # API のベースURL
paths: {}
OpenAPI 記述は OpenAPI Object として表現され、トップレベルにある要素は OpenAPI Object のフィールドです。openapi, info, paths が必須項目になっています。
フィールドに記述できる型などの詳細はドキュメントを参照ください。
Path items
APIエンドポイントごとのHTTPメソッドやリクエスト/レスポンスの構造を定義します。ここが最も関心を寄せる部分です。
paths:
  /path1:  # 1つ目の API パス
    post:  # HTTP メソッド
      requestBody: ...  # リクエストボディ
      responses:   ...  # レスポンス
  /path2: # 2つ目の API パス
    get:
      parameters:  ...  # リクエストパラメータ
      responses:   ...  # レスポンス
paths フィールドはマップ構造です。キーがAPIパス、値が Path Item Object になっています。
Path Item Object は各HTTP メソッドをフィールドに持ち、そこにぶら下がる形でリクエストボディやレスポンスを定義します。
具体例として https://petstore3.swagger.io で公開されているペットストア APIを参考に、「ペット登録API」と「ペット参照API」の2つを定義していきます。
ペット登録API
API エンドポイントの基本情報は次のようになります。
| 項目 | 内容 |
|---|---|
| Path | /pet |
| HTTP Method | POST |
| API の説明 | 新しいペットを登録する |
上記を OpenAPI では以下のように表現します。
paths:
  /pet:
    post:
      tags:
        - addPet
      description: Add a new pet to the store.
      operationId: addPet
tags と operationId は OpenAPI 記述にのみ登場している項目で必須ではありません。
しかし、OpenAPI 記述からコードを自動生成する際にクラス名やメソッド名の一部になる点で有用なので指定しています。
tags: 操作をグループ化するために使用する文字列。今回はAPIパス毎に専用の文字列を設定しています。operationId: 操作を識別するための一意な文字列。
続いてリクエストボディは次の形になります。
| フィールド名 | 型 | 必須 | 説明 |
|---|---|---|---|
id |
int64 | - | ペットのID |
name |
string | ◯ | ペットの名前 |
photoUrls |
array | ◯ | 写真のURLリスト |
isAvailable |
boolean | - | 利用可能かどうか |
上記を OpenAPI では requestBody フィールドを使って表現します。Added lines の範囲が追記した箇所です。
paths:
  /pet:
    post:
      tags:
        - addPet
      description: Add a new pet to the store.
      operationId: addPet
      #  ----- Added lines  ----------------------------------------
      requestBody:
        description: Create a new pet in the store
        required: true
        content:
          application/json:
            schema:
              type: object
              required: # 必須パラメータの指定
                - name
                - photoUrls
              properties:
                id: # フィールド名
                  type: integer # 型
                  format: int64
                  description: ペットのID # 説明
                name:
                  description: ペットの名前
                  type: string
                photoUrls:
                  description: 写真のURLリスト
                  type: array
                  items:
                    type: string
                isAvailable:
                  description: 利用可能かどうか
                  type: boolean
      #  ----- Added lines  ----------------------------------------
受信可能なリクエストパラメータをpropertiesで型情報と共に列挙し、requiredで必須パラメータを指定しています。
最後にレスポンスを定義します。ここでは以下のフィールドを持つ JSON 形式になります。
✅ 成功レスポンス(200)
| フィールド名 | 型 | 必須 | 説明 |
|---|---|---|---|
id |
int64 | - | ペットのID |
name |
string | ◯ | ペットの名前 |
photoUrls |
array | ◯ | 写真のURLリスト |
isAvailable |
boolean | - | 利用可能かどうか |
❌ エラーレスポンス(500)
| フィールド名 | 型 | 説明 |
|---|---|---|
error |
string | エラーメッセージ |
上記を OpenAPI では responses フィールドを使って、ステータスコード毎に記述します。
paths:
  /pet:
    post:
      tags:
        - addPet
      description: Add a new pet to the store.
      operationId: addPet
      requestBody:
        description: Create a new pet in the store
        required: true
        content:
          application/json:
            schema:
              type: object
              required: # 必須パラメータの指定
                - name
                - photoUrls
              properties:
                id: # フィールド名
                  type: integer  # 型
                  format: int64
                  description: ペットのID # 説明
                name:
                  description: ペットの名前
                  type: string
                photoUrls:
                  description: 写真のURLリスト
                  type: array
                  items:
                    type: string
                isAvailable:
                  description: 利用可能かどうか
                  type: boolean
      #  ----- Added lines  ----------------------------------------
      responses:
        '200':
          description: Successful operation
          content:
            application/json:
              schema:
                type: object
                required: # 必須パラメータの指定
                  - name
                  - photoUrls
                properties:
                  id: # フィールド名
                    type: integer # 型
                    format: int64
                    description: ペットのID # 説明
                  name:
                    description: ペットの名前
                    type: string
                  photoUrls:
                    description: 写真のURLリスト
                    type: array
                    items:
                      type: string
                  isAvailable:
                    description: 利用可能かどうか
                    type: boolean
        '500':
          description: Internal server error
          content:
            application/json:
              schema:
                type: object
                properties:
                  error:
                    type: string
                    description: エラーメッセージ
      #  ----- Added lines  ----------------------------------------
これでペット登録APIのスキーマ定義が完成しました。
YAML 表現だけでは可読性が高くないですが、IntelliJ IDEAを使っていれば読みやすい形でプレビュー表示してくれます。これならドキュメントとして活用できそうです。
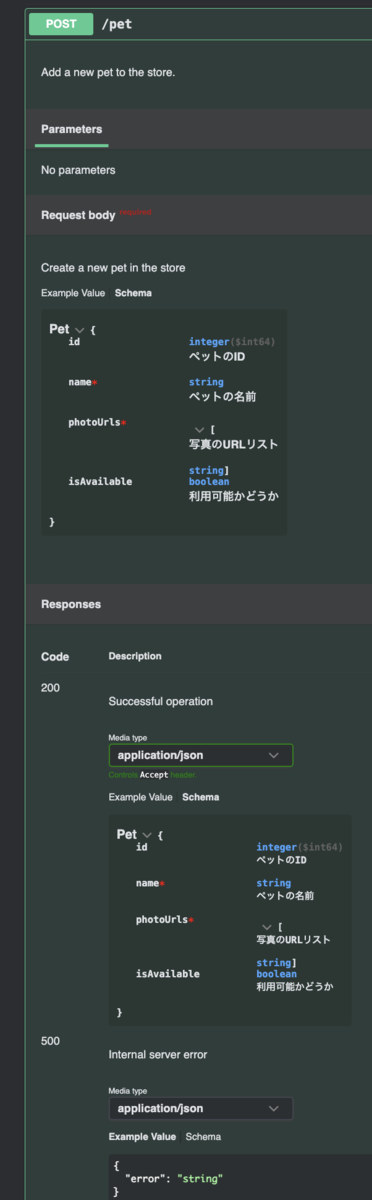
プレビューには Swagger UI と Redoc UI が選択でき、上記は Swagger UI のものです(参考)。
ペット参照API
今度はペット情報を参照するAPIスキーマを定義します。 まず、エンドポイントの基本情報は次のようになります。
| 項目 | 内容 |
|---|---|
| Path | /pet/{petId} |
| HTTP Method | GET |
| API の説明 | ペット情報を取得する |
上記を OpenAPI では以下のように表現します。
paths:
  /pet/{petId}:
    get:
      tags:
        - getPet
      description: Returns a single pet.
      operationId: getPetById
次にパラメータの情報です。
| フィールド名 | 型 | 必須 | 説明 |
|---|---|---|---|
petId |
int64 | ◯ | ペットのID |
上記を OpenAPI では parameters を使って表現します。
paths:
  /pet/{petId}:
    get:
      tags:
        - getPet
      description: Returns a single pet.
      operationId: getPetById
      #  ----- Added lines  ----------------------------------------
      parameters:
        - name: petId
          in: path
          description: ID of pet to return
          required: true
          schema:
            type: integer
            format: int64
      #  ----- Added lines  ----------------------------------------
最後にレスポンスの情報は次のようになります。説明の都合上、ペット登録APIと敢えて同じ形式にしました。
✅ 成功レスポンス(200)
| フィールド名 | 型 | 必須 | 説明 |
|---|---|---|---|
id |
int64 | - | ペットのID |
name |
string | ◯ | ペットの名前 |
photoUrls |
array | ◯ | 写真のURLリスト |
isAvailable |
boolean | - | 利用可能かどうか |
❌ エラーレスポンス(500)
| フィールド名 | 型 | 説明 |
|---|---|---|
error |
string | エラーメッセージ |
ペット登録APIと同じく、OpenAPI では以下のように表現します。
paths:
  /pet/{petId}:
    get:
      tags:
        - getPet
      description: Returns a single pet.
      operationId: getPetById
      parameters:
        - name: petId
          in: path
          description: ID of pet to return
          required: true
          schema:
            type: integer
            format: int64
      #  ----- Added lines  ----------------------------------------
      responses:
        '200':
          description: Successful operation
          content:
            application/json:
              schema:
                type: object
                required: # 必須パラメータの指定
                  - id
                  - photoUrls
                properties:
                  id: # フィールド名
                    type: integer # 型
                    format: int64
                    description: ペットのID # 説明
                  name:
                    description: ペットの名前
                    type: string
                  photoUrls:
                    description: 写真のURLリスト
                    type: array
                    items:
                      type: string
                  isAvailable:
                    description: 利用可能かどうか
                    type: boolean
        '500':
          description: Internal server error
          content:
            application/json:
              schema:
                type: object
                properties:
                  error:
                    type: string
                    description: エラーメッセージ
      #  ----- Added lines  ----------------------------------------
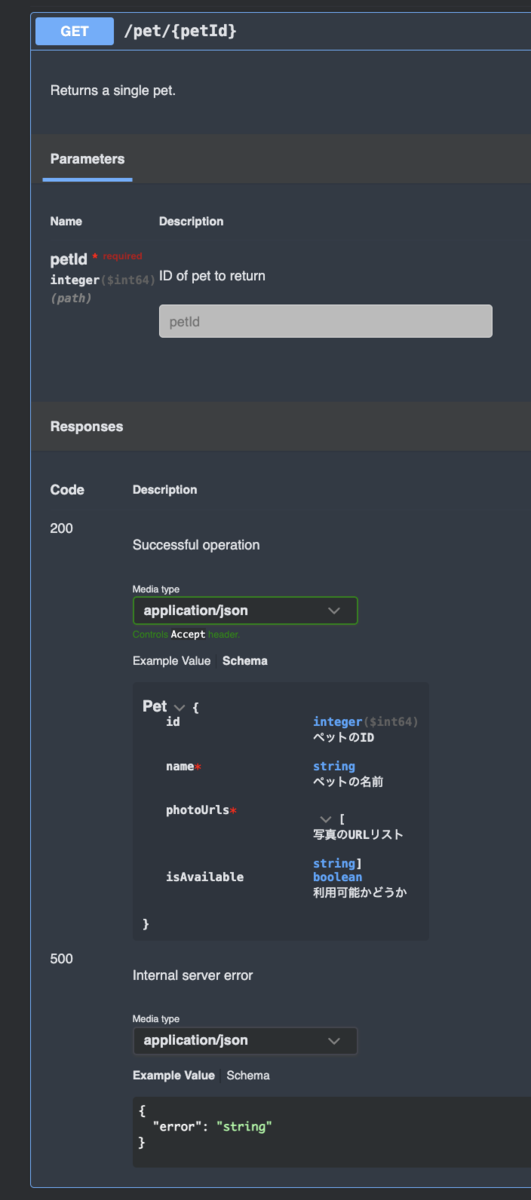
これでペット参照APIのスキーマ定義も完成しました。 Swagger UI で見ると次のようになっています。
Reusable components
ここまで書いた内容を見直すと、リクエストボディやレスポンスにペットオブジェクトが繰り返し登場しており冗長に感じます。 ペットの属性が増えたときに複数箇所を修正しなければならないため、できればまとめたいところです。
      requestBody:
        description: Create a new pet in the store
        required: true
        content:
          application/json:
            schema:
              type: object
              required:
                - name
                - photoUrls
              # ペットオブジェクトが登場
              properties:
                id:
                  type: integer
                  format: int64
                  description: ペットのID
                name:
                  description: ペットの名前
                  type: string
                photoUrls:
                  description: 写真のURLリスト
                  type: array
                  items:
                    type: string
                isAvailable:
                  description: 利用可能かどうか
                  type: boolean
      responses:
        '200':
          description: Successful operation
          content:
            application/json:
              schema:
                type: object
                required:
                  - name
                  - photoUrls
                # ここにもペットオブジェクトが登場
                properties:
                  id:
                    type: integer
                    format: int64
                    description: ペットのID
                  name:
                    description: ペットの名前
                    type: string
                  photoUrls:
                    description: 写真のURLリスト
                    type: array
                    items:
                      type: string
                  isAvailable:
                    description: 利用可能かどうか
                    type: boolean
また、500レスポンスの形式もペット登録APIとペット参照APIで同じ内容が登場しているため共通化したいです。
        '500':
          description: Internal server error
          content:
            application/json:
              schema:
                type: object
                properties:
                  error:
                    type: string
                    description: エラーメッセージ
そこで役に立つのが Components Object です。
Components Object は再利用可能なオブジェクトのセットで、OpenAPI オブジェクトの components フィールドに記述できます。
ペットオブジェクトと500レスポンスを次のように定義します。
openapi: 3.0.0
info:
  title: Pet Store
  description: This is a sample Pet Store Server
  version: 0.0.1
servers:
  - url: https://petstore3.swagger.io/api/v3
paths: {}
#  ----- Added lines  ----------------------------------------
components:
  schemas:
    # ペットオブジェクト
    Pet:
      required:
        - name
        - photoUrls
      type: object
      properties:
        id:
          type: integer
          format: int64
          description: ペットのID
        name:
          description: ペットの名前
          type: string
        photoUrls:
          description: 写真のURLリスト
          type: array
          items:
            type: string
        isAvailable:
          description: 利用可能かどうか
          type: boolean
  responses:
    # 500レスポンス
    InternalError:
      description: Internal server error
      content:
        application/json:
          schema:
            type: object
            properties:
              error:
                type: string
#  ----- Added lines  ----------------------------------------
定義したコンポーネントを参照するには $ref を使用します。
paths:
  /pet:
    post:
      tags:
        - addPet
      description: Add a new pet to the store.
      operationId: addPet
      requestBody:
        description: Create a new pet in the store
        required: true
        content:
          application/json:
            schema:
              # ペットオブジェクトを参照
              $ref: '#/components/schemas/Pet'
      responses:
        '200':
          description: Successful operation
          content:
            application/json:
              schema:
                # ペットオブジェクトを参照
                $ref: '#/components/schemas/Pet'
        '500':
          # レスポンスコンポーネントを参照
          $ref: '#/components/responses/InternalError'
  /pet/{petId}:
    get:
      tags:
        - getPet
      description: Returns a single pet.
      operationId: getPetById
      parameters:
        - name: petId
          in: path
          description: ID of pet to return
          required: true
          schema:
            type: integer
            format: int64
      responses:
        '200':
          description: Successful operation
          content:
            application/json:
              schema:
                # ペットオブジェクトを参照
                $ref: '#/components/schemas/Pet'
        '500':
          # レスポンスコンポーネントを参照
          $ref: '#/components/responses/InternalError'
これで繰り返し記述を共通化して、スッキリさせることができました!
まとめ
OpenAPI を使ってAPIスキーマを定義する方法を紹介しました。
これがAPI仕様を把握するドキュメントとなり、人間だけでなくAIエージェントも開発を進めやすくなりそうです。
また、OpenAPI 記述を元にクライアント/サーバのコードを自動生成して型安全にコーディングできるので、その方法も今後紹介できればと思います。
さいごに
ホワイトプラスでは、ビジョンやバリューに共感していただけるエンジニアを募集しています!
ネットクリーニングの「リネット」など、「生活領域×テクノロジー」で事業を展開しています。
弊社に興味がある方は、オウンドメディア「ホワプラSTYLE」をご覧ください。オンラインでのカジュアル面談も可能ですので、ぜひお気軽にお問い合わせください。